Wednesday, October 08, 2008

The Fix is In! For the Exchange 2007 provisioning issue with ILM 2007 anyway…

Microsoft released the fix for the Exchange 2007 provisioning issue I blogged about earlier.  Essentially, Exchange didn’t properly use the domain controller parameter that was to the Update-recipient cmdlet, which in environments with multiple DCs would result in the mailbox not being properly provisioned because the DC in use by Update-Recipient didn’t know anything about the mailbox, as it was created on another DC.

Anyway, after a long wait (and a teaser release/un-release), Update Rollup 4 for Exchange Server 2007 SP1 has been re-released and contains the fix.  The KB article (949858) behind the specific issue is also public now.  Here are the details on the issue from the KB:

When ILM 2007 calls the Update-Recipient cmdlet to provision user objects, ILM 2007 passes a domain controller parameter to the Update-Recipient cmdlet to make sure that the task uses the same domain controller as the domain controller that was used where the object was created.

However, the Update-Recipient cmdlet creates two domain controller sessions. One session is for a domain controller, and the other session is for a global catalog server. The Update-Recipient cmdlet uses only the parameter that was passed for the global catalog server session, and it enables the Active Directory directory service driver to obtain a domain controller for the domain controller session. Then, the domain controller session is used for various operations, such as retrieving the properties of the object to pass to the Recipient Update Service.

If the domain controller that is selected for the domain controller session differs from the domain controller that is passed by ILM 2007, the Recipient Update Service object may not find the recipient. This issue occurs because of replication latency.

When this issue occurs, user objects may not be updated correctly by the Update-Recipient cmdlet. These objects are displayed as "mail users" instead of as "user mailboxes" in Exchange Management Console.

You can download Update Rollup 4 for Exchange Server 2007 SP1 here.

Monday, October 06, 2008

ISA 2006 and Slow LDAPS Authentication

I recently ran into an issue with LDAPS Authentication from ISA 2006 to an internal domain controller.  I am working with a client to deploy two ISA 2006 Enterprise Edition servers in their DMZ.  They have single NICs (NLB is enabled) and are not members of the internal domain, and are in their own workgroup (I know, I know, not an ideal use of ISA, but that’s a story for another time).  Because they are not in the domain, we decided to use LDAPS authentication (they already had an internal CA and certificates on all of their domain controllers).

Rules were added on the internal firewall rule to allow the ISA servers to do CRL checking to the internal CA and LDAPS traffic (port 636) to the domain controllers.  On the outside firewall, a rule was created to allow the ISA servers internet access for external CRL checking (this was needed to validate the third-party CA certificates in use on the published web servers when making the SSL connection from ISA to the web servers).

Once the rules were in place, the setup of LDAPS on the web listener was straightforward and it worked – sort of.  The initial login took about 15-20 seconds.  Subsequent logins were immediate, until LDAPS session were idle for too long, then the next login took 15-20 seconds again.

It was discovered that the internally issued certificates had both an Active Directory and HTTP CRL Distribution Point, and that AD was listed first.  The theory was the ISA was attempting to pull the CRL from AD first and failing, before succeeding in pulling the HTTP published version.

A coworker helped me find a series of registry keys that control CRL checking at the computer level.  Most of the CRL checking settings found out there though a good old Google search are for a specific user or IIS related, neither of which is applicable in the ISA LDAPS scenario, as the connection is not established under any specific user context and IIS is not involved at all for the LDAPS session.

According to the information, the default timeout value when processing a CRL is 15 seconds, which would explain the 15-20 seconds logons from ISA perfectly.  I added the following registry key to both ISA servers, rebooted them, and now the initial logins take 2-3 seconds.  Note that the value specified is in milliseconds and that the HEX value 000003e8 is equivalent to 1000 in decimal (1 second).

Location HKLM\SOFTWARE\Microsoft\Cryptography\OID\EncodingType 0\CertDllCreateCertificateChainEngine\Config
Type REG_DWORD
Name ChainUrlRetrievalTimeoutMilliseconds
Value 000003e8


Also note that if this value is set to 0 or if this value is undefined, the default value that is used is 15000 milliseconds.  It also doesn’t work if you spell retrieval wrong the first time like I did…

Tuesday, September 30, 2008

Sharing a Wireless Connection with Virtual Server 2005 VMs

Here's an interesting item (to me anyway).  If you are running Virtual Server 2005 on a computer with a wireless connection, Virtual Server won't let you share that connection with VMs.  You can only share wired connections with VMs.  To get around this, you can install the Microsoft Loopback Adapter, and enable Internet Connection Sharing on your wireless connection.  Then you can create a Virtual Network using the Loopback Adapter, and assign your VMs to that.  One thing to remember though, and it may or may not matter depending on what your are doing with your VMs, is that ICS enables NAT and hands out IP addresses in 192.168.0.0/24 subnet, so your VMs will not be on the same subnet as your physical machine.

The instructions for setting all of this up are on Wade Wagner's blog.  Here is the direct link:

http://www.architectingwith.net/2006/11/30/SettingUpNetworkingOverWirelessWithVirtualServer2005R2.aspx

Thursday, July 24, 2008

Exchange 2007 Provisioning Issue with ILM 2007 FP1

I've been meaning to post on this for a while, but have been pretty busy.

A few months ago I did a project which included Exchange 2007 provisioning with ILM. When running a small development environment (single DC, very important), everything ran fine. But when it got to production I noticed that when the new connector space object is exported to AD, the mailbox is a "Legacy Mailbox" in Exchange because it does not have all of the required Exchange 2007 attributes. I also noticed that when any type of update for that user is exported to the AD MA, the mailbox is then updated to be a standard Exchange 2007 mailbox. From Shawn's blog post, I learned the ILM code is simply using the Update-Recipient cmdlet under the covers to do the update. In Exchange 2003, the Recipient Update Service handled the stamping of the remaining Exchange specific object on the user object and completing the set up of the mailbox. In Exchange 2007, the RUS has been removed, so the Update-Recipient cmdlet was specifically added to address this type of situation. Update-Recipient is called by ILM every time there is an export for that object, and is supposed to use the same DC that the AD MA is using. Key word: supposed.

Turns out there is a bug in the Update-Recipient cmdlet. It does NOT consistently use the same DC as the MA, so while you are exporting your object to one DC, Update-Recipient goes off to another DC where the object does not exist yet. Best of all, when it does, it silently errors out.

After much poking around, I developed a suitable, fairly simple workaround - trigger a second export for any provision action to AD. The workaround goes like this:

  1. Extend the Metaverse schema to include an attribute for the AD SID (we'll call it ad_sid for this).
  2. Create an inbound flow rule to place the user SID from your AD MA to the Metaverse ad_sid attribute.
  3. Find a relatively insignificant attribute that flows from the Metaverse to all users in your AD MA (we'll use title for this).
  4. Create an export flow rule using a Rules Extension to only flow the title attribute from the Metaverse to the AD MA if ad_sid is present in the Metaverse (you'll need to send both the title and ad_sid attributes to the AD MA title attribute).

Now, when a new user is provisioned into AD, a confirming import will bring the user's SID into the Metaverse. The user won't have a title, but the import of the SID will trigger the new export flow rule and generate a pending export of the title. Ensure a suitable amount of time passes to allow AD replication to occur so that the new user is present on all DCs, and then when this second change is exported, Update-Recipient will be called again. Regardless of what DC it uses, it will then be successful and the user will go from "Legacy Mailbox" to "Exchange Mailbox".

Here is a sample bit of code for the Export Flow Rule:

Select Case FlowRuleName
Case "set_cs.title"
If mventry("ad_sid").IsPresent Then
csentry("title").Value = mventry("title").Value
End If
Case else
Throw New EntryPointNotImplementedException()

End Select

In terms of a fix, it is important to remember this is actually an Exchange issue, not an ILM issue. For someone within MS I was able learn that supposedly the KB article behind this is KB949858, but it is not publicly released. The fix was initially slated for Exchange 2007 SP1 Rollup 3, but it didn't make it in and should in Rollup 4 - the release of which, I learned from Aaron's post today, is imminent. Looks there are some issues with the links to the download though; I imagine they will be straightened out shortly.

Friday, April 25, 2008

KB250455: How to change display names of Active Directory users

Nothing earth shattering here, just something I can never seem to find quickly when I need it.

When a new user is created in Active Directory, the Full name field is always generated in FirstName LastName format. In turn, this field sets the Display Name field on creation, therefore, you end up with a FirstName LastName formatted global address list.

You can make this change by using the Adsiedit utility. Adsiedit not only changes the default way the Display Name field is built, but also the Full Name (that is, the "cn") field, therefore, users appear in the chosen format when you look in the Users and Computers snap-in.

http://support.microsoft.com/kb/250455

Friday, April 18, 2008

Two PowerShell Event Logs on Exchange 2007 Servers

When PowerShell 1.0 is installed an Event Log called "Windows PowerShell" is created.  When Exchange 2007 is then installed, a second Event Log called "PowerShell" is created.  When this log is created, multiple entries are added each time the Exchange Management Shell is opened, so this log rapidly fills up and you will get errors unless you go and change the configuration of the Event Log.  More interestingly, the entries in the "PowerShell" Event Log are unable to be resolved so that the description can be presented.  A typical entry in this log looks like this:

Event Type:      Information
Event Source:      PowerShell
Event Category:      (4)
Event ID:      403
Date:            5/12/2007
Time:            2:45:55 AM
User:            N/A
Computer:      MYCOMPUTER
Description:
The description for Event ID ( 403 ) in Source ( PowerShell ) cannot be found. The local computer may not have the necessary registry information or message DLL files to display messages from a remote computer. You may be able to use the /AUXSOURCE= flag to retrieve this description; see Help and Support for details. The following information is part of the event: Stopped, Available,       NewEngineState=Stopped
      PreviousEngineState=Available
      SequenceNumber=20
      HostName=Default MSH Host
      HostVersion=1.0.0.0
      HostId=2afe9b64-5601-4df3-8478-6efc5cf2c471
      EngineVersion=1.0.0.0
      RunspaceId=433e6992-c711-47a8-b732-728a45104767
      PipelineId=
      CommandName=
      CommandType=
      ScriptName=
      CommandPath=
      CommandLine=.

To resolve this issue, simply delete the following registry key, which will delete the "PowerShell" Event Log:

HKEY_LOCAL_MACHINE\SYSTEM\CurrentControlSet\Services\Eventlog\PowerShell

A reboot is required for the change to take effect.  Once the "PowerShell" log is deleted and the server is rebooted, the PowerShell events will flow into the "Windows PowerShell" Event Log without issue, and you will be able to properly view the description of the events.

Note though, that updates or service packs for Exchange may put this Event Log back in, so check for it after any update and simply delete the registry key again if it appears.

Friday, April 11, 2008

Using Messenger accounts with non-Microsoft SMTP Domains in LCS/OCS With PIC

I'm not sure if the subject on this post even makes sense, but it's the best I could come up with. Essentially the issue is that even though you have LCS or OCS set up with Public IM Connectivity (PIC) you can't add contacts that use MSN/Live Messenger unless they have a Microsoft SMTP domain for their account. The valid MS domains (as of the latest update on the KB article) are:

  • hotmail.co.jp
  • hotmail.co.th
  • hotmail.co.uk
  • hotmail.com
  • hotmail.com.ar
  • hotmail.com.tr
  • hotmail.de
  • hotmail.it
  • hotmail.fr
  • messengeruser.com
  • msn.com
  • simpatico.ca
  • passport.com
  • passporthotmail.com
  • webtv.com

I think it's safe to assume the live.com domain and all the country specific variations of it are on that list as well, but I haven't tested those.

But, you can set up a Messenger account with any SMTP domain you want. If you add them in to the LCS/OCS client, they simply don't work. I may be an idiot, but for the longest time I thought that's just the way it was. Then today I stumbled across a KB article that describes how to do it. It's a matter of manipulating the IM address of the contact you want to add. It's not very obvious, and it would be nice to see the OCS client/server catch these and fix them for you, or at least tell you the proper format.

So I know user@gmail.com is a Messenger user, and I want to add them to my OCS client, the address should be entered in the following format:

user(gmail.com)@msn.com

Odd, but hey it works. Check out the full KB article here.

Thursday, March 20, 2008

Comparing Exchange 2007 UM and Cisco Unity UM

I've had many clients ask for a feature comparison between Exchange 2007 UM and Cisco Unity CM.  Until I stumbled across this blog posting from Matt McGillen, I had nothing tangible to offer.  Kudos to Matt for assembling this.

Wednesday, March 12, 2008

ILM 2007 Design Concepts Document Set

There is a great set of ILM Design Concept documents available here.  Essentially they are Microsoft's collective response and official design recommendations for key scenarios they often see from customers.  Heavy reading, but great knowledge.

From the overview:

Design Concepts for Reference Attributes
This document explains how reference attributes are processed by ILM 2007 for direct attribute mapping scenarios and provides a conceptual explanation of a custom solution for advanced mapped reference attributes. It also includes design recommendations for both direct and advanced mapped attributes.

Design Concepts for Correlating Digital Identities
This document discusses considerations for mapping attributes across different identities and configuring joins based on your business requirements. It introduces the concept of Correlation ID and explains how you can deploy a Correlation ID to establish strong object relationships in your identity integration solution.

Design Concepts for Implementing IFunctions
This document introduces the concept of object-level identity functions (IFunctions) in an identity integration scenario, discusses possible implementation options, and also provides implementation recommendations.

Design Concepts for Implementing Reverse Joins
This document discusses some of the common reverse join implementation approaches for synchronizing identity objects in ILM 2007. It provides two recommended solutions for implementing reverse joins- reverse joins based on Transient management agents and reverse joins based on Auxiliary management agents.

Design Concepts for Provisioning Based on Group Membership
This document discusses the design and the implementation of an identity integration solution that supports provisioning decisions based on Active Directory group membership.
In these documents, you will find detailed discussions of specific challenges that are often encountered during the design of ILM solutions. These documents present some of the most common design issues that are discussed in newsgroups and in e-mail discussion groups.

Friday, February 15, 2008

Using the Group Populator application with ILM 2007 FP1

UPDATE 07.29.2008 - Corrected the version of Windows from Standard to Enterprise.

In the Microsoft Identity and Access Management Series, Microsoft provided a Group Populator application for MIIS 2003 to allow for the provisioning and management of Groups within MIIS.  As you should already know, MIIS 2003 is now ILM 2007.  ILM 2007 FP1 requires Visual Studio 2005 and .NET 2.0, but the application code was done in VS 2003 and .NET 1.1.  Let the fun begin!

The instructions documented in this post are taken from here (also a great location for background information on the Group Populator application), and updated wherever I ran into issues.

As an FYI, I am using the following applications and versions:

  • Windows Server 2003 Enterprise SP2
  • ILM 2007 FP1
  • SQL 2005 SP2
  • Visual Studio 2005 SP1
  • .NET Framework 2.0 SP1

Installing the Pre-Requisites

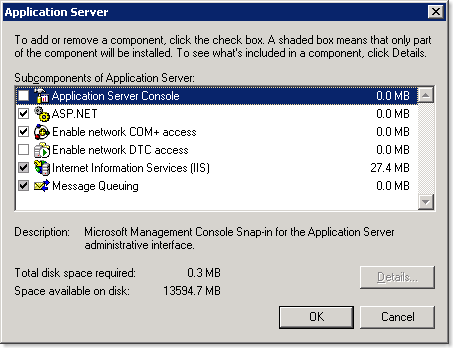
To get started, you'll need a few Windows pre-requisites:

  • IIS (with ASP.NET)
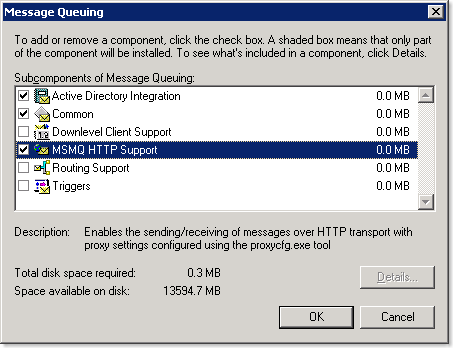
  • Message Queuing (with MSMQ HTTP Support)

image

image 

Now that you have MSMQ installed, you'll need to configure the appropriate queues for the IdM Notification Service.  To create the queues follow these steps:

  1. In Administrative Tools, open the Computer Management console.
  2. Expand Services and Applications, and then expand Message Queuing.
  3. Right-click Private Queues, and select the option to create a new queue.
  4. Type the name as AccountProvisioning and then select the Transactional option.
  5. Do not change the other default options, and click OK.
  6. Repeat steps 3, 4, and 5 to create message queues called SelfServiceProvisioning and miisGroupManagement.

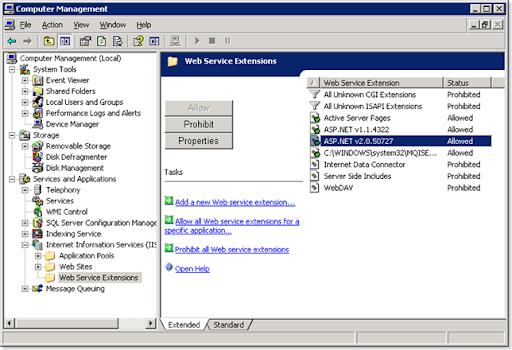
In IIS, under Web Service Extensions, ensure  ASP.NET 2.0.0xxx is listed and allowed. If you installed IIS after you installed the .NET 2.0 Framework, it likely won't be.  You can run the 'aspnet_regiis -i' command from %windir%\Microsoft.NET\Framework\v2.0.50727 to re-register it.

image

Preparing the IdM Notification Service

One of the components used by the Group Populator application is the IdM Notification Service (also included in the Microsoft Identity and Access Management Series).  The IdM Notification Service used some code provided by Microsoft called the Data Access Application Block for .NET v2 to simplify the accessing of SQL data from .NET code.  Unfortunately, it doesn't work for .NET 2.0.

Instead, download and install the Enterprise Library for .NET Framework 2.0 - January 2006.  After the install, go to Start - Microsoft patterns & practices - Enterprise Library - January 2006 and launch Build Enterprise Library.cmd.  This will compile all of the components within the Enterprise Library.

Now download and install the Microsoft Identity and Access Management Series.  Extract it and install the Identity and Access Management Tools and Templates.msi included within it.

So as not to alter the original code, copy the IdMNotificationSvc solution directory (under "Identity and Access Management Tools and Templates\Provisioning and Workflow") to a different location.  I prefer to keep all my ILM-related code together, so I copy it to my "ILM Projects" directory.

Open the IdMNotificationSvc solution in Visual Studio 2005, and allow it to convert it from .NET 2003 to .NET 2005.  Now you'll need to add a project reference to one of the .dlls from the Enterprise Library we compiled earlier.  Go to Project - Add Reference and browse to the Microsoft.Practices.EnterpriseLibrary.Data.dll (by default, located in the "\Program Files\Microsoft Enterprise Library January 2006\bin" directory).

Then, in SMTPmailer.cs, you must replace

using Microsoft.ApplicationBlocks.Data;

with

using Microsoft.Practices.EnterpriseLibrary.Data;

or it won't compile. Microsoft.ApplicationBlocks.Data was the old name, Microsoft.Practices.EnterpriseLibrary.Data is the new name.  If you want to clean it up even more, you can remove the reference for Microsoft.ApplicationBlocks.Data.  Then save and compile the solution.  As a side note, you may need to turn off the Explicit Option in the project unless you want to go through all of the code and add the Dim statements for every variable.

Now that the solution is built you must configure the compiled IdMNotificationSvc.exe to run as a service.  To do this, follow these steps:

  1. Open a command prompt and run the InstallUtil.exe to create the service.  Use the syntax: C:\<.NET Framework Installation Folder>InstallUtil <IdMNotificationSvc.exe build path>.  For example:

    C:\Windows\Microsoft.NET\Framework\v1.1.4322>InstallUtil C:\IdmNotificationSvc\bin\debug\IdMNotificationSvc.exe
  2. Type NET START IdMNotificationSvc to start the service.

Creating the Group Management Database

In my sample environment, SQL is installed on the same server as ILM.  You will need to execute this section on your SQL server, and the account running the script must have SQL admin rights in order to create a SQL database.

Browse to the "Identity and Access Management Tools and Templates\Provisioning and Workflow\GroupManagement\GroupManagementDB" directory.  For a remote SQL server, copy this directory locally.  Launch the CreateGroupPopulatorDB.cmd file.

Following the execution of the file, you should have and miisGroupManagement SQL database.  Since the script will create the DB in the default SQL location, you may need to move the database and log files to your desired locations.

Building the Group Management Website

Like the IdM Notification Service project, copy the miisGroupManagement solution directory (under "Identity and Access Management Tools\Provisioning and Workflow\GroupManagement") to a different location so as not to alter the original code.

Open the miisGroupManagement solution and allow Visual Studio 2005 to convert it.  You must also follow the post-conversion step of setting up the project as a web application.  Follow the directions given by Visual Studio after the conversion is complete.  Now you can compile the solution.  There should be no changes required to the code, but again, you may need to turn off the Explicit Option in the project unless you want to go through all of the code and add the Dim statements for every variable.

Now that the code is compiled, a virtual directory in IIS must be created for the web application.  Open the IIS administration console and under the default web site, start the wizard to create a new virtual directory and use the following settings:

  1. For the Alias, use miisGroupManagement.
  2. Use the directory of the miisGroupManagement solution.
  3. Allow the Read and Run Scripts permissions.

Once the wizard is done, open the Properties of the new virtual directory and configure the default page to be Default.aspx (on the Documents tab).

image

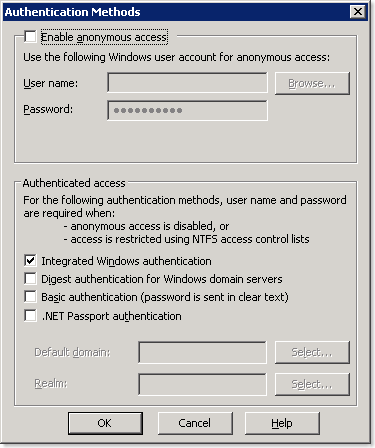
Now go to the Directory Security tab, and click Edit under Authentication and Access Control.  Disable anonymous access and enable Integrated Windows authentication.

image

As a side note, now would be a good time to take a look at the permissions of the miisGroupManagement solution directory and ensure you aren't allowing the wrong users to access this site.

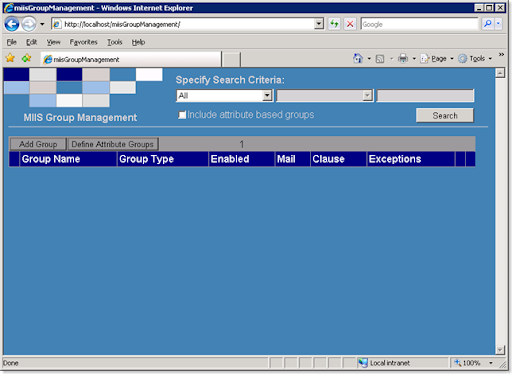
Test the website by browsing to http://localhost/miisGroupManagent from the ILM server, or substitute your server name in place of localhost to try it remotely.  You should see the following:

image

Building the Group Populator Application

Like the other projects, copy the GroupPopulator solution directory (under "Identity and Access Management Tools\Provisioning and Workflow\GroupManagement") to a different location so as not to alter the original code.

Open the GroupPopulator solution and allow Visual Studio 2005 to convert it.  There should be no changes required to the code, but again, you may need to turn off the Explicit Option in the project unless you want to go through all of the code and add the Dim statements for every variable.

Configuring ILM

Rather than regurgitate the fine documentation that is already out there for this, I will simply say that from the instructions provided here, you should now complete Task 4: Configuring the Metaverse for Groups and Task 5: Creating the New MA (under the Group Management section).

Putting it all Together

Now that you have configured the Group Management MA, you can start to add groups to the Group Management web application.  To update the membership of the groups according to the clause and any exceptions you defined, you must run the GroupPopulator.exe application (created when you compiled the Group Populator solution earlier).  As you can probably guess, the GroupPopulator.exe will need to be run regularly to update the group memberships based on any additions, deletes, or changes in the Metaverse.

Depending on how you plan on using the application, you will also need to configure your other MAs accordingly to support the management of groups.  If provisioning of groups will be done, you will also need to update your provisioning code.

That should get you going with the Group Populator application.  I hope this helps anyone who runs into the issues I had using the application with ILM 2007, Visual Studio 2005, and .NET 2.0.