Tuesday, December 18, 2007

Relocating the Exchange 2007 Queue Database

Summary from the "How to Change the Location of the Queue Database" article in the Exchange Server TechCenter:

Microsoft Exchange Server 2007 uses an Extensible Storage Engine (ESE) database for queue message storage. Formerly known as JET, ESE is a method that defines a low-level API to the underlying database structures in Exchange Server. All the different queues are stored in a single ESE database. Queues exist only on servers that have the Hub Transport server role or the Edge Transport server role installed.

The location of the queue database is controlled by the QueueDatabasePath parameter in the EdgeTransport.exe.config application configuration file that is located in the C:\Program Files\Microsoft\Exchange Server\Bin directory. The location of the logs is controlled by the QueueDatabaseLoggingPath parameter in the same file.  The following list describes some important items to consider when you change the location of the queue database and logs:

  • If the target directory doesn't exist, it will be created for you if the parent directory has the following permissions applied to it:
    • Network Service: Full Control
    • System: Full Control
    • Administrators: Full Control
  • The existing queue database files Mail.que and Trn.chk are not moved. New queue database files are created at the new location after you save the EdgeTransport.exe.config application configuration file and restart the Microsoft Exchange Transport service. The existing database files are left at the old location. However, they are no longer used.
  • The existing queue database transaction log files Trn.log, Trntmp.log, Trnnnn.log, Trnres00001.jrs, Trnres00002.jrs, and Temp.edb are not moved. New queue database transaction logs are created at the new location after you save the EdgeTransport.exe.config application configuration file and restart the Microsoft Exchange Transport service. The existing transaction log files are left at the old location. However, they are no longer used.
  • If you want to change the location of the queue database but reuse the existing queue database files, you must move or copy the database files when the Microsoft Exchange Transport service is stopped.  The same goes for the logs.
The steps to move the database (and logs) are as follows:

  • Create the target directory (or directories if you are moving the logs to a separate location)
  • Edit the QueueDatabasePath parameter in the EdgeTransport.exe.config file to reflect the new database path
  • Edit the QueueDatabaseLoggingPath parameter in the EdgeTransport.exe.config file to reflect the new database path
  • Stop the Microsoft Exchange Transport service
  • If preserving the old database (which you should because there is likely mail in there that has yet to be delivered), move the Mail.que and Trn.chk from the original location to the new location.
  • If preserving the old logs (again, which you should) move the Trn.log, Trntmp.log, Trnnnnn.log, Trnres00001.jrs, Trnres00002.jrs, and Temp.edb files to the new location.
  • Start the Microsoft Exchange Transport service
Monday, December 03, 2007

Configuring Microsoft DNS from the command line

DNScmd.exe is a handy utility for configuring your Windows Server 2003 DNS server from the command line.  it is very useful for making a large number of changes to zones or records, particularly when used in conjunction with a script.

It is included with the Windows Server 2003 Service Pack 2 32-bit Support Tools.

For more information on DNScmd and its abundance of switches and options, check out this link.

Exchange 2000/2003 RUS not updating certain objects?

This is a great article for troubleshooting issues in which the Exchange 2000 or 2003 Recipient Update Service is not stamping particular object or objects in particular OUs:

http://support.microsoft.com/kb/254030

Monday, October 29, 2007

Granting "Send As" rights in Exchange 2007

Many times it is necessary to grant a service account the ability to open a users mailbox and/or send email as that user.  Products that tightly integrate with Exchange like Blackberry Enterprise Server (BES), Quest Archive Manager (QAM), and many others need this in order to function properly.  This is accomplished by granting the service account the "Full Mailbox Access" and "Send As" rights for all mailboxes in the organization (assuming the application in question is to be rolled out enterprise-wide).

For those that are unclear, it is critical to understand the difference between "Send As" and "Send on Behalf Of".  "Send As" allows a user to "impersonate" another user and send email as the other user.  For example, if User A is granted "Send As" rights to User B's mailbox, then User A is able to send messages directly as User B and means that the recipient of the message will think that User B has sent the message, even though it was actually User A that sent it.  The "Send As" right can only be done by an administrator; a user cannot grant the "Send As" right to another user.

"Send on Behalf Of" allows a user to send email from another user's mailbox, but the sending user is not impersonated.  For Example, if User A is granted "Send on Behalf Of" rights to User B's mailbox, then User A is able to send message from User B's mailbox and the recipient would receive a message that is from "User A on behalf of User B".  By looking at the "From" field in the email, it is always very clear who is sending the message.  Like "Send As", the "Send on Behalf Of" right can be granted by an administrator, but unlike "Send As", "Send on Behalf Of" can also be established by the end user.  Through the Outlook client, a user can grant another user the ability to send on behalf of them.

For more information on granting "Send As" in an Exchange 2003 environment, or granting "Send on Behalf Of" permissions, check out this tutorial from MSExchange.org.

Now back to the problem at hand...

"Full Mailbox Access" and "Send As" rights can be granted on a single mailbox (or batch of mailboxes) with the following PowerShell cmdlets (using User A and User B from the examples above):

Add-MailboxPermission UserB -AccessRights FullAccess -user UserA

Add-ADPermission UserB -ExtendedRights Send-As -user UserA

Note that granting "Full Mailbox Access" does not include the "Send As" permission; "Send As" must be explicitly granted.

The problem with this method is that even if the script is such that it will grant the appropriate rights on all mailboxes in the environment, this will not automatically grant the rights to the service account for new mailboxes and the script must be re-run on a regular basis.  For message archival applications in particular this is a problem as some data may be missed because the service account was unable to access the mailbox.  So you must use a method to grant the required permissions automatically.

A personally recommended best practice is to create a group that has the "Send As" rights in Exchange and add the appropriate user accounts to that group.  Because there is risk with any account that has these rights to your entire Exchange organization, those account must be as secure as possible and the membership of that group must be controlled and monitored tightly.

To grant the required permissions, follow these steps:

  1. At the command prompt, type ADSIedit.msc. This requires the Windows Server 2003 Support Tools.
  2. In the Action menu, select Connect to…
  3. Select the Select a well known Naming Context radio button.
  4. Select Configuration from the drop-down list.
  5. The Default (Domain or server that you logged in to) radio
    button is selected. Leave this button selected if the machine you are
    logged in to is in the same domain as the Exchange 2007
    organization. If the machine you are logged in to is in a different
    domain, select Select or type a domain or server and enter the
    domain controller name.
  6. Click OK to return to the ADSI Edit window.
  7. Select the Configuration node that contains the name of the domain
    controller that holds your Exchange 2007 organization.
  8. Navigate to CN=Services | CN = Microsoft Exchange |
    CN=”Your Exchange Organization”
    .
  9. Right-click the organization node and select Properties.
  10. Select the Security tab and click Advanced.
  11. Click Add, and select the appropriate user or group.
  12. In the Permission Entry window, ensure that Apply Onto is set to This object and all child objects.
  13. Check the box for Full Control in the Allow column.
  14. Click OK to add the entry, and click OK to exit the windows.
  15. Close ADSIedit.

Be very sure that the accounts you use are not also in any groups which are denied "Send As" rights, or you will still be denied.  By default, the Domain Admins, Enterprise Admins, and Exchange Organization Administrators groups are denied "Send As" rights (and should be kept that way).

Awesome

A friend emailed me this today and although I had seen it a while back, it still cracked me up.  I'm not sure why it would be comforting to know that nothing I do will be as awesome as this, but it's still funny.

starwarsrocks

Friday, October 19, 2007

PdaNet vs. Internet Sharing on the AT&T Tilt

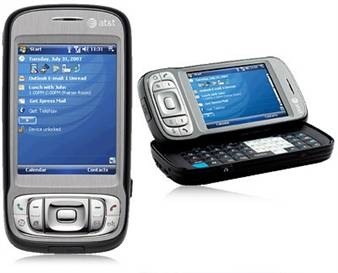
tilt1

One of the things I've been trying to get working with my Tilt is the ability to tether it to my laptop for data connectivity. AT&T offers a tethering option to data plans for $20, but I don't intend on using this 24/7 for an Internet connection, just something to use in a pinch. The AT&T cops swarming down on me is a chance I'm prepared to take.

The first thing I tried was PdaNet from June Fabrics. I used version 1.80 because it added WM6 support. I was wholly unsuccessful in getting this to work over USB or Bluetooth. I consistently got a "Modem is Busy" error, so I did a little more digging and found several others that had tried and failed to get PdaNet working with the Tilt. In the process, I also found out about Internet Sharing, a feature that (apparently) was offered on the 8525.

On the AT&T Tilt (the successor to the 8525), Internet Sharing was replaced by Wireless Modem in Connections. While Internet Sharing is no longer listed in Connections, it is still present on the device and can be used. Internet Sharing effectively does the same thing as PdaNet.

To locate Internet Sharing:

  1. Go to Start>Programs>Tools>File Explorer.
  2. Open the Windows Folder.
  3. Scroll down until you locate Internet Sharing.

To add a shortcut to an existing folder on your device:

  1. Tap and Hold on Internet Sharing and select Copy from the pop up menu.
  2. Navigate to a folder where you would like to put your shortcut and select Menu>Edit>Paste. I placed it in \Windows\Start Menu\Programs\Tools.

To use Internet Sharing:

  1. Pair your device with your PC (Bluetooth or USB).
  2. Locate the Internet Sharing shortcut you created and tap on it to open the application.
  3. Select USB or Bluetooth from the PC Connection type drop down (depending on your needs, obviously).
  4. Select MEdiaNet from the Network Connection drop down.
  5. Tap on Connect.

I tested this with Vista and didn't have any trouble with it.

UPDATE 03.12.08 - After a reader commented on not being able to get this to work with Vista, I realized I forgot one piece of the puzzle that I did well before I started to figure out Internet Sharing. In its default configuration, the Tilt wouldn't connect to Vista at all via USB (at least not with my laptop, so it's possible it is specific to my hardware). To fix this, go to Settings - Connections - USB to PC and turn off "Enable advanced network functionality" (whatever that is). You will need to re-enable this when you want to use it with XP.

Friday, October 05, 2007

Clustering in VMware Workstation 6

UPDATE 02.15.08: I updated the last line of the VMX file in step 4 (Thanks for the heads up Jim!)

I have a need to build an Exchange 2007 single copy cluster on Server 2003 in VM environment. This is something I've done before with Microsoft Virtual Server, but haven't had the opportunity to do it with VMware Workstation (OK, I had the opportunity, but never needed to until now). Since VMware Workstation is a paid product, I assumed clustering and setting up a shared SCSI bus would be included and pretty straightforward. Wrong. No options in GUI exist for this, and the VMware help files and knowledgebase provide no assistance. I love VMware, but come on, no easy way to set up a cluster in a product that is meant for lab testing various configurations and applications?


Anyway, after poking around on the web for a while, I was able to compile a working method for setting this up. Here are the steps I took:


  1. Create two VMs with a single disk on SCSI bus 0, install Windows, get updates, etc.

  2. On one VM, add two new SCSI disks (one for data, one for quorum) on SCSI bus 1 (I put them on SCSI1:1 and SCSI1:2), make them independent, persistent, and fully allocate the drive space so that the VMs don't fight over expanding/managing the disk file size.

  3. On the second VM, add the two already created SCSI disks on SCSI bus 1 (again, I put them on SCSI1:1 and SCSI1:2), and again make them independent and persistent.

  4. Edit the .vmx files for each VM and add the following lines:

    scsi1.sharedbus = "Virtual"
    disk.locking = "false"
    diskLib.dataCacheMaxSize = "0"
    diskLib.dataCacheMaxReadAheadSize = "0"
    diskLib.dataCacheMinReadAheadSize = "0"
    diskLib.dataCachePageSize = "4096"
    diskLib.maxUnsyncedWrites = "0"

  5. Fire up the VMs and both should have two disks ready for formatting and clustering.

Admittedly, the lines added to the .vmx file came from Geert Baeke’s Blog, specifically his posting on clustering in VMWare Workstation 4.5 and higher. Also, he has another good post around clustering in VMware Workstation using iSCSI. Trying that out is already on my “to do” list.

As a side note, when you complete botch the configuration of your Windows Cluster (like I did) and want to start over, use this command from the C:\windows\cluster directory on each node, then reboot the node:

cluster node <node_name> /forcecleanup

Wednesday, October 03, 2007

Exchange 2007 Autodiscover White Paper

Newly updated.

This white paper provides detailed information about the Microsoft Exchange Autodiscover service. It also includes information about how to configure this service in various deployment scenarios. Use the conceptual information and procedures in this white paper to help you deploy the Autodiscover service.

http://technet.microsoft.com/en-us/library/59adba4e-44e1-4aa2-b09d-06988cbeab2d.aspx

Tuesday, October 02, 2007

Windows Server 2008 Core: Read-Only DC

New in Windows Server 2008 is the option to create a read-only domain controller (RODC). To deploy an RODC, the domain controller that holds the PDC emulator operations master role (also known as flexible single master operations or FSMO) for the domain must be running Windows Server 2008. In addition, the functional level for the forest must be Windows Server 2003.

Because the administration of a Server Core is done from the command line only (at least initially), dcpromo must be run with a host of options to promote the Server Core installation to a domain controller (read-only or standard). From the Windows Server 2008 Technical Library, here are the command line options for dcpromo. The options can optionally be specified in an answer file.

So, to create a RODC on a Server Core installation without also installing DNS, the command line would be:

dcpromo /unattend /ReplicaDomainDNSName:<FQDN_of_Domain> /ReplicaOrNewDomain:ReadOnlyReplica /SiteName:<site_name> /InstallDNS:No /DatabasePath:"C:\NTDS" /LogPath:"C:\NTDS" /SysVolPath:"C:\SYSVOL"

Obviously, the paths for the database, logs, and sysvol would need to be changed to the appropriate location for your environment. The bulk of the parameters are pretty self-explanatory, but two need attention called out. First, the /ReplicaOrNewDomain:ReadOnlyReplica parameter is what defines the DC as a RODC. Using /ReplicaOrNewDomain:Replica creates a standard DC in an existing domain. Using /ReplicaOrNewDomain:NewDomain should be pretty obvious, but it does introduce a slew of different required parameters and options. Also, when creating a RODC you must specify the site name using the /SiteName parameter. I’m not sure, but I would assume this is for the enabling of universal group membership caching. So, if you haven’t figured it out, you’ll need to create the site for the RODC in AD DS before you promote the server to a RODC.

Other handy parameters:

  • /ConfirmGC:No – Do not configure the server as a GC (Default is Yes).
  • /CriticalReplicationOnly:Yes – This forces dcpromo to only replicate the critical directory information before rebooting, postpoting the full replication of the remaining AD DS information until after a reboot; can be useful for large directories to speed up the dcpromo process (Default is No).
  • /ReplicationSourceDC:<FQDN_of_DC> – This forces the replication operation to use a specific domain controller.

Windows Server 2008 Core: The Basics

The Server Core installation option of the Microsoft Windows Server 2008 operating system is a new option for installing Windows Server 2008. A Server Core installation provides a minimal environment for running specific server roles that reduces the maintenance and management requirements and the attack surface for those server roles. A Server Core installation supports the following server roles:

  • Active Directory Domain Services
  • Active Directory Lightweight Directory Services (AD LDS)
  • Dynamic Host Configuration Protocol (DHCP) Server
  • DNS Server
  • File Services
  • Print Server
  • Streaming Media Services
  • Web Server (IIS)

Local administration of a Server Core installation is done from the command prompt, but all roles can be administered from other computers running the appropriate MMC console. The Server Core Team Blog has a nice posting on the basics of getting a Server Core installation up and running. Here are the extreme basics to get a Server Core up and running on your network:

Change the Administrator Password

net user administrator *

Configure the IP Address and DNS Server

netsh interface ipv4 set address name <interface_name> static <ip_address> <default_gateway> <subnet_mask> 1

netsh interface ipv4 set dnsserver <interface_name> <pri_dns_server_ip> primary

netsh interface ipv4 add dnsserver <interface_name> <sec_dns_server_ip>

Join the Domain

netdom join %computername% /domain:<domain_name> /userd:<domain_user> /passwordd:*

shutdown –r

Rename the Server

netdom renamecomputer %computername% /newname <new_server_name>

shutdown -r

Activate the Server

slmgr.vbs -ato

Allow Remote Administration (should really be done via GPO)

netsh advfirewall firewall set rule group="Remote Administration" new enable=yes

Active Directory Topology Diagrammer

With the Active Directory Topology Diagrammer tool, you can read your Active Directory structure through Microsoft ActiveX Data Objects (ADO). The Active Directory Topology Diagrammer tool automates Microft Office Visio to draw a diagram of the Active Directory Domain topology, your Active Directory Site topology, your OU structure or your current Exchange 200X Server Organization. With the Active Directory Topology Diagrammer tool, you can also draw partial Information from your Active Directory, like only one Domain or one site. The objects are linked together, and arranged in a reasonable layout that you can later interactively work withthe objects in Microsoft Office Visio.

http://www.microsoft.com/downloads/details.aspx?familyid=cb42fc06-50c7-47ed-a65c-862661742764&displaylang=en&tm

Monday, October 01, 2007

Microsoft Certification Changes

So Microsoft is dropping the MCSE moniker in favor of “Microsoft Certified IT Professional” (MCITP) in flavors for specific Microsoft products or technologies. The MCP moniker is now “Microsoft Certified Technology Specialist” (MCTS). Basically, the MCTS is the entry level certification on a Microsoft product or technology, and MCITP is the advanced certification. At the top level there is the “Microsoft Certified Architect” (MCA) which is a whole other animal. That’s all fine, well, and good with me - I was one that never liked the “Engineer” designation anyway. Here are the currently available MCITP certifications:

The other big change, beyond the names, is that certifications will now expire after three years. For the most part, rather than tying MCITP certifications to specific products, Microsoft has chosen product agnostic names for these certifications (I’m not sure why they chose to specifically call out Project Server 2007, but that’s not one I’d likely be after, so it’s irrelevant to me anyway). To renew your certification, you will be required to take the current MCTS exams for your area of expertise. So the MCTS exams under the MCITP certifications will rotate out as products age, but the MCITP certificate name will remain constant. Many people won’t, but I like this approach. It reduces the number of certifications someone has, and if they have any of the new MCITP certifications, you know they are up to date. I like the idea of reducing the number of certifications because I personally have the following:

  • MCITP: Enterprise Messaging Administrator
  • MCTS: Microsoft Exchange Server 2007 Configuration
  • MCSA: Security on Windows Server 2003
  • MCSE: Security on Windows 2000
  • MCSE: Security on Windows Server 2003
  • MCSE: Messaging on Windows 2000
  • MCSE: Messaging on Windows Server 2003
  • MCSA: Messaging on Windows Server 2003
  • MCSA on Windows Server 2003
  • MCSE on Windows Server 2003
  • MCSE on Windows 2000
  • MCSE on Windows NT 4.0
  • MCP+I
  • MCP

I am not going to list these on a business card or email signature, and most people couldn’t care less about my experience with NT 4.0. So after getting the new MCSE equivalent certification, I would be simplified to:

  • MCITP: Enterprise Administrator
  • MCITP: Enterprise Messaging Administrator

Much better, and should carry more weight in time.

You’ll notice that “Enterprise Administrator” is not on the list of currently available MCITP certifications. Neither is “Server Administrator”. The “Enterprise Administrator” (MCSE equivalent) and “Server Administrator” (MCSA equivalent) certifications are based on Windows Server 2008, which is obviously not available yet, so neither are the certifications. Upgrade exams will be available for both the MCSE and MCSA path. Trika from Microsoft Learning notes on her blog that the MCSE/MCSA upgrade exams will be available October 29, 2007, but these exams only get you part of the way. Below is a summary of all the exams needed to get the new “MCITP: Enterprise Administrator” and “MCITP: Server Administrator” certifications.

Now get studying…


Starting Fresh (No Upgrades)

MCITP: Server Administrator (3 Exams)

  • 70-640 (MCTS: Windows Server 2008 Active Directory, Configuring)
  • 70-642 (MCTS: Windows Server 2008 Network Infrastructure, Configuring)
  • 70-646 (MCITP: Windows Server 2008 Administrator)

MCITP: Enterprise Administrator (5 Exams)

  • 70-640 (MCTS: Windows Server 2008 Active Directory, Configuring)
  • 70-642 (MCTS: Windows Server 2008 Network Infrastructure, Configuring)
  • 70-643 (MCTS: Windows Server 2008 Applications Infrastructure, Configuring)
  • 70-620 (MCTS: Microsoft Windows Vista, Configuring) OR 70-624 (MCTS: Deploying and Maintaining Windows Vista Client and 2007 Microsoft Office System Desktops)
  • 70-647 (MCITP: Windows Server 2008 Enterprise Administrator)

Upgrading from MCSE 2003

MCITP: Enterprise Administrator (3 Exams)

  • 70-649 (MCTS: Upgrading Your MCSE on Windows Server 2003 to Windows Server 2008, Technology Specialist)
  • 70-620 (MCTS: Microsoft Windows Vista, Configuring) OOR 70-624 (MCTS: Deploying and Maintaining Windows Vista Client and 2007 Microsoft Office System Desktops)
  • 70-647 (MCITP: Windows Server 2008 Enterprise Administrator)

MCITP: Server Administrator (2 Exams)

  • 70-649 (MCTS: Upgrading Your MCSE on Windows Server 2003 to Windows Server 2008, Technology Specialist)
  • 70-646 (MCITP: Windows Server 2008 Administrator)

Upgrading from MCSA 2003

MCITP: Enterprise Administrator (4 Exams)

  • 70-648 (MCTS: Upgrading Your MCSA on Windows Server 2003 to Windows Server 2008, Technology Specialist)
  • 70-643 (MCTS: Windows Server 2008 Applications Infrastructure, Configuring)
  • 70-620 (MCTS: Microsoft Windows Vista, Configuring) OR 70-624 (MCTS: Deploying and Maintaining Windows Vista Client and 2007 Microsoft Office System Desktops)
  • 70-647 (MCITP: Windows Server 2008 Enterprise Administrator)

MCITP: Server Administrator (2 Exams)

  • 70-648 (MCTS: Upgrading Your MCSA on Windows Server 2003 to Windows Server 2008, Technology Specialist)
  • 70-646 (MCITP: Windows Server 2008 Administrator)

Wednesday, September 12, 2007

A Little Levity...


Exchange 2007 SP1 Documentation

The Exchange Team Blog has a nice post up with links to new and updated documentation on the changes in Exchange 2007 SP1 and how to deploy SP1 in your environment. Here is the listing:

ILM 2007 Password Management Collection

The ILM 2007 Password Management Collection is a set of documents that are designed to you through the Password Change Notification Service (PCNS) feature used by ILM 2007 to synchronize passwords from an authoritative Active Directory source to other connected data stores. The material presented is in a simplified environment that is designed to help the user become familiar with the PCNS feature included with ILM 2007 in a time efficient manner.

http://www.microsoft.com/downloads/details.aspx?familyid=ae09d2f5-8ac2-4769-ab6a-48fe35a25c63&displaylang=en&tm

Exchange Management Shell Quick Reference

Exchange 2007 introduces a new management platform called the Exchange Management Shell, based on Windows PowerShell, formerly codenamed "Monad". This quick reference guide provides a list of frequently used cmdlets, important conventions, and useful tips. The information is presented by feature area, such as recipient, transport, and database administration. This quick reference guide applies to Exchange 2007 SP1 and the RTM version of Exchange 2007.

http://www.microsoft.com/downloads/details.aspx?familyid=01a441b9-4099-4c0f-b8e0-0831d4a2ca86&displaylang=en&tm

Thursday, August 30, 2007

ISA, Exchange 2007, and SAN Certificates

The ISA Server Product Team Blog has a great new post on the issues surrounding publishing sites with SSL certificates with Subject Alternative Names. Great information to consider for Exchange 2007/ISA designs…

http://blogs.technet.com/isablog/archive/2007/08/29/certificates-with-multiple-san-entries-may-break-isa-server-web-publishing.aspx

Thursday, August 09, 2007

Exchange 2007 and the legacyExchangeDN

Jim McBee has a great post on his blog (complete with a Powershell script) for upgrading a mail-enabled user to a mailbox-enabled user and setting the old legacyExchangeDN as an X500 address. Leveraging the X500 address ensures that any old emails, nicknames, etc. still resolve to the correct user after the change.

Exchange 2007 Visio Stencils

This stencil and template provided enable you to create Visio drawings that contain Exchange Server 2007 objects. These shapes include icons for Exchange 2007 server roles, networking, telephony and Unified Messaging objects, Active Directory and directory service objects, client computers and devices, and other Exchange organization elements.

Get it here.

Wednesday, July 18, 2007

Re-installing Network Clients/Servers from the Command Line

On Monday, I was helping a client work through their planning and testing of a Novell to Microsoft migration. One of the issues in their environment is that "Client for Microsoft Networks" and "File and Print Sharing for Microsoft Networks" had both been uninstalled from all of their workstations. Not disabled, uninstalled. Without them, joining the domain and other migration processes weren't going to happen. I spent some time looking for a method of remotely installing those pieces to avoid the client having to go around to each workstation and install them. I ended up finding a great solution that did exactly what we needed (and worked) and was feeling like a genius. My genius was fleeting as moments later I learned a co-worker not more than 15 feet away on the other side of a cubicle wall knew all about my "solution" and had been using it for years at other clients and projects.

In any event, I thought it was worthwhile enough to capture and post. The solution conisists of two Microsoft provided utilities that are well hidden and documented even less, snetcfg.exe and snetcfg_wxp.exe. One is for XP and the other for 2000. I'll let you figure out which is which...

JSI FAQ has the details on the utility and the various command line switches for the Windows 2000 version here. As far as I can tell, the switches are the same for the XP version. Also note that the link to the XP version on the JSI FAQ page is incorrect, it links to the Windows 2000 version. Use the link in the paragraph above to get it.

Monday, July 16, 2007

Installing SQL 2000 MSDE SP4

The command line necessary to install SQL 2000 SP4 on an MSDE installation is not very well documented. I have had a couple of cases recently where I needed to install it and each time had to go looking for it. For anyone interested, here it is (the setup.exe is the setup included in the extracted SP4 files):

setup.exe /upgradesp sqlrun /l*v c:\msdelog.log

If you haven't already set the SA password, you'll need to do it when you install the service pack.  In this case, add the SAPWD parameter to the end of the command:

setup.exe /upgradesp sqlrun /l*v c:\msdelog.log SAPWD=<password>

For specific SQL instances, you will need to specify the SQL instance name.  For example, to upgrade the MSDE instance for ISA Server 2006, you'll need to specify an instance name of "MSFW":

setup.exe /upgradesp sqlrun /l*v INSTANCENAME=MSFW c:\msdelog.log SAPWD=<password>

Friday, July 13, 2007

Changing the Windows GINA

Ran into a Novell to Microsoft migration case where the client wants to leave the Novell client on the Windows XP workstations to allow access to non-migrated volumes, but wants the user to have the Microsoft GINA for login. When all the volumes are migrated, then the client will be removed or the workstation will be reimaged. The change itself is simple is relatively simple. To replace the Novell GINA with the Microsoft GINA, edit the registry under the following key:

HKEY LOCAL MACHINE\Software\Microsoft\Windows NT\CurrentVersion\Winlogon

Change the data value GinaDLL from "NWGINA.DLL" to "MSGINA.DLL" (without the quotation marks). This changes the GINA, but the Novell client still prompts for authentication to Novell after you log in to the Windows GINA. To stop that, you need to make a change to this registry key:

HKEY LOCAL MACHINE\SOFTWARE\Novell\Network Provider\Initial Login

Add a string value called Login when NWGina Not Loaded (unless it already exists of course) and set the value to "no". You'll find that you still get a nice Novell splash screen and we don't want that! To turn it off, you'll need to make a change to this registry key:

HKEY LOCAL MACHINE\SYSTEM\CurrentControlSet\Services\NetWareWorkstation\Parameters

Add a dword value called NoLogoDisplay (unless it already exists) and set the value to 1. Finally, if you don't want the big red N in the tray, you'll need to remove the NWTRAY value from the following registry key:

HKEY LOCAL MACHINE\SOFTWARE\Microsoft\Windows\CurrentVersion\Run

And now the Novell client is fully "disabled". You can still log on to Novell by going to the Programs - Novell and logging in from there.

Outlook 2007 Autodiscover Whitepaper

Microsoft Office Outlook 2007 includes the ability to automatically configure user accounts. Outlook uses one of two discovery mechanisms to automatically configure accounts: Autodiscover and Common Settings Discover. This whitepaper describes how the discovery mechanisms work, and how an administrator can modify settings in an XML file to configure Autodiscover for an organization.

Outlook 2007 Autodiscover Whitepaper

Thursday, July 12, 2007

AD Explorer v1.0

A nice Microsoft/Sysinternals provided AD utility to have handy. From Microsoft:

Active Directory Explorer (AD Explorer) is an advanced Active Directory (AD) viewer and editor. You can use AD Explorer to easily navigate an AD database, define favorite locations, view object properties and attributes without having to open dialog boxes, edit permissions, view an object's schema, and execute sophisticated searches that you can save and re-execute.

AD Explorer also includes the ability to save snapshots of an AD database for off-line viewing and comparisons. When you load a saved snapshot, you can navigate and explorer it as you would a live database. If you have two snapshots of an AD database you can use AD Explorer's comparison functionality to see what objects, attributes and security permissions changed between them.

AD Explorer works on Windows 2000 and higher.

http://www.microsoft.com/technet/sysinternals/utilities/adexplorer.mspx

Thursday, July 05, 2007

Junk E-mail Reporting Tool

Here’s something every user of Outlook 2003 and Outlook 2007 should have, the Junk E-mail Reporting Tool. Here’s the overview from Microsoft:

The Junk E-mail Reporting Tool submits e-mail to Microsoft when you explicitly choose to do so. If you receive a junk e-mail and want to report it to us for analysis, first select the e-mail in Outlook and then click the junk e-mail button on your tool bar. You will see a pop-up window asking whether you want to report the selected e-mail to Microsoft and its affiliates. When you click “Yes” to confirm that you’d like to report the selected e-mail as junk e-mail, the junk e-mail will be deleted from your Inbox and sent to FrontBridge, a Microsoft company, for analysis to help us improve the effectiveness of our junk e-mail filtering technologies.

It beats simply adding them to your blocked senders, since the spam never comes from the same address twice anyway…

Wednesday, June 27, 2007

VMware Workstation 6 on Vista

Ran into a “bug” with VMware Workstation 6 when running on Vista. Or, at least I thought it was a bug. When trying change the amount of system RAM that VMware as a whole can use (Edit – Preferences – Memory), or trying to change the memory swapping preferences on the same tab, VMware happily accepts your settings as you click OK. The problem is, the settings don’t change. Make the change, click OK, go back in – no change. Couldn’t find anything out on the net or VMware’s knowledge base.

After much agonizing, a light bulb went on over my head. User Account Control. When I modify my VMware shortcut to run as administrator, and accept the UAC prompt when launching, everything works fine. I know I had “run as administrator” turned on for VMware Workstation 5.5, but I must not have set it up after upgrading to Workstation 6.

Tuesday, June 26, 2007

Configuring TCP/IP from the Command Line

In order to configure TCP/IP settings such as the IP address, Subnet Mask, Default Gateway, DNS and WINS addresses and many other options you can use Netsh.exe.

Netsh.exe is a command-line scripting utility that allows you to, either locally or remotely, display or modify the network configuration of a computer that is currently running. Netsh.exe also provides a scripting feature that allows you to run a group of commands in batch mode against a specified computer. Netsh.exe can also save a configuration script in a text file for archival purposes or to help you configure other servers.

Netsh.exe is available on Windows 2000, Windows XP, Windows Vista, Windows Server 2003, and Windows Server 2008

http://www.petri.co.il/configure_tcp_ip_from_cmd.htm

Wednesday, June 20, 2007

Exporting Groupwise & NDS Information

I have had several instances where I needed a dump of information from ConsoleOne, but didn't know how. Now someone pointed me to the GroupWise 6 Import/Export Utility for ConsoleOne.

From Novell:

The Novell GroupWise 6 Import/Export utility is an add-on to ConsoleOne that enables you to transfer GroupWise information into and out of NDS.

The GroupWise Export utility reads NDS and GroupWise object information from NDS and creates an ASCII delimited text file containing the object attributes.

The GroupWise Import utility reads an ASCII-delimited text file created by the GroupWise Export utility or by a third-party export, and creates NDS and GroupWise objects with attributes from the file. The Import utility supports most NDS classes (including extensions) and GroupWise classes.

Read more about it and get the add-in here.

Monday, June 18, 2007

Freeware Hard Drive Wipe

I am trying to phase out my older lab PCs in favor of VMs, so I went looking for a utility to completly wipe the hard drives in them. I thought I would be able to easily find a bootable ISO that would do this, since most of the computers have no floppy drives and the ones that do usually don't work anymore. Apparently there are some paid/shareware utilities out there for this, but I wanted something freeware.

So I found a bootable ISO that does nothing but boot (from www.bootdisk.com) and a freeware application to wipe the drive (from Dr. Gordon F. Hughes at UCSD). Put the two together with a little ISO manipulation with WinISO and there you go, one freeware drive wiping utility on a bootable CD.

SharePoint Woes

Before you read this and think "He's an idiot!", understand that I am not a SharePoint guru. You are still free to think I am an idiot for any other reason.

I have been attempting to move a SharePoint Services 2.0 site from one server to another. What a pain. The site is small and was set up for my daughter's girl scout troop. I wonder if they are the only ones with a SharePoint site...

Anyway, I have been a good boy and have backed up the site nightly using stsadm.exe from a script. However, I find out now that an stsdm.exe backup is only usable on the server it was made on. So, you have to restore the System State and the STS_Config database before you can restore your site. stsadm.exe is a great tool, just not useful in the scenario I found myself. I am more likely to need to restore a site to an alternate server than I am to fully restore a downed SharePoint server. I just found out about the smigrate.exe tool which is meant for moving a site from server to server, but can also serve as a backup utility.

In my case, I am trying to move a top-level site. You must have the new site/virtual server created and extended before doing the restore with smigrate.exe, which was another battle for me thanks to my earlier failed restoration attempts. Recovery entailed uninstalling SharePoint Services and MSDE and then re-installing. Probably overkill, but it worked.

Finally, after all of that, I was able to use smigrate.exe to restore the site to the new server. One small problem. The site user accounts did not come across, only the site owner I assigned when extending the new virtual server. OK, so it's a big problem. For my site I will simply be re-adding them since there are only a dozen or so, but I still need to figure out how to backup and restore them in the same process. Now it's time to update my ISA publishing rules and my backup script to use smigrate.exe.

Here's a nice KB article on the use of stsadm.exe:

KB889236: Supported scenarios for using the Stsadm.exe command-line tool to back up and to restore Windows SharePoint Services Web sites and personal sites in SharePoint Portal Server 2003

Maybe next time I'll read the Administrator's Guide for Windows SharePoint Services first.

Live and learn.

Thursday, June 14, 2007

Always open with a joke...

According to a new study, 99% of women say they don't like men who wear leather pants. Which works out perfectly, since 100% of men who wear leather pants don't like women.

- Conan O'Brien